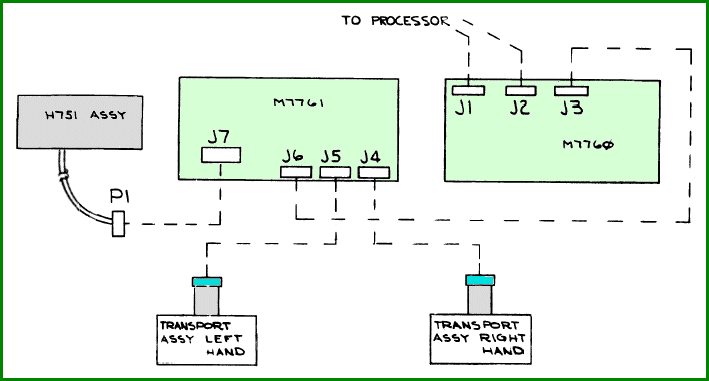
TU60   tape drive and controller

Direct jumps to:
If you want to print this page on A4 or Letter format, set the scaling in the printer driver to 80%.

INTRODUCTION
The TU60 DECassette tape transport was donated by Hans Schulz. The unit had collected some dust on his attick, and as the attick is going to be used for other hobbies, this unit had to go (and a complete PDP-11/10 with core memory, soon to appear on this site)! Here is the result after some cleaning.
TU60 tape drive front
As you can see, the TU60 tape unit has two independent tape drive mechanisms.
On the left of the two drives is a storage box for 4 tape cartridges.


AVAILABLE DOCUMENTION
  • TU60 DECassette tape transport maintenance manual     (DEC-00-HTU60-C-D)
  • TU60 DECassette tape transport engineering drawings    (Rev. C and Rev. D)
Back to top

GENERAL TAPE DRIVE INFORMATION
The TU60 DECassette Tape Transport is a solid state, magnetic tape, data storage device. The TU60 has two independent tape cassette transport mechanisms, its own power supply (H751) and two internal boards, M7760 (TU60 Cassette logic) and M7761 (TU60 Cassette servo and read). The power supply provides +5 VDC power for the logic, and +15 and -15 VDC power for the drive motors and the amplifiers. The boards contain all the logic and circuits needed for data formatting, error checking, and cassette "housekeeping".
The tape motion within the cassette is directly controlled by two DC motors, without the use of a capstan or pinch rollers. Because of this direct reel-to-reel drive system, the tape speed across the read/write head varies as the take-up reel fills with tape. The tape speed for a read/write opration is approximately 6 inches per second at the beginning of the tape, and increases to approximately 12 inches per second at the end of the tape. Thus, the tape is written with varying bit densities, but at a constant frequency along the tape. The tape motion control logic within the transport ensures that tape motion stops only at a block or file gap.

TU60   Tape   Transport   Unit
Input Voltage
 
  95 .. 130 VAC  47 - 63 Hz.  (TU60-AA)
190 .. 260 VAC  47 - 63 Hz.  (TU60-AB)
Input Current1.0 Amps
Power dissipation120 W.
Operating temperature50 to 105°F   (10 to 40°C)
Dimensions19" (width), 18¼" (depth), 5¼" (height)
Weight32 lb   (14,06 kg)

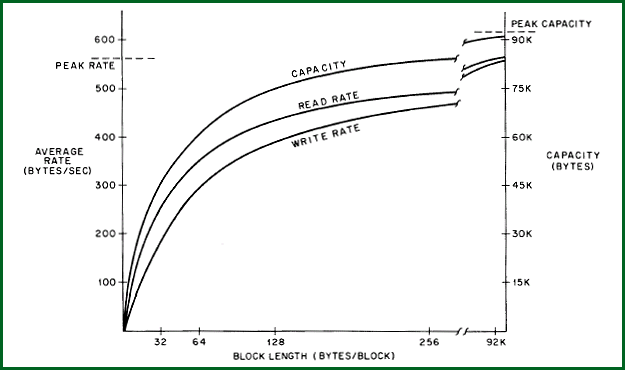
During a write operation, 8-bit data bytes are parallel transferred from the interface to the TU60, phase encoded, and serially recorded on the tape. Except for the tape length, there is no maximum limit to the number of bytes that may be grouped into a data block. However, it is not possible to replace an individual block on a recorded tape.
During a read operation, the self-clocking data bits are serially read from the tape, then parallel transferred to the interface at a peak transfer rate of 562 bytes per second.

TU60   Operational   Data
Recording density350 to 700 bits / inch
Recording methodPhase encoding
Data transfer rate562 bytes/sec (average)
FormatVariable block length (hardware formatted)
Read / write speed9,6 inch/sec
Search speed22 inch/sec
Rewind speed100 to 150 inch/sec
Start / Stop time
 
< 20 ms read/write
< 45 ms search (linear ramp control)
Rewind time30 sec (max), < 20 sec typical
Bit error rate
      » write errors
      » read errors
 
 
1 in 108
1 in 108 (unrecoverable)
1 in 107 (recoverable, 3 rereads)

Each drive has identical and separate motor control and servo logic. However, formatting and read/write logic is common to both drives. It is therefore not possible to read or write from both drives simultaneously, but it is possible to perform a read or write operation on the selected drive and rewind the other drive concurrently.
Back to top


TU60 MAGNETIC TAPE CASSETTE
DECassette 
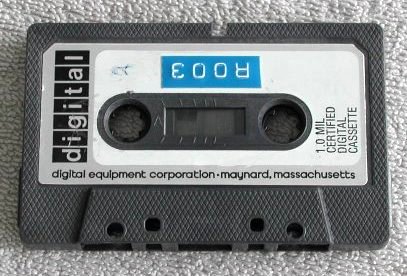
It is extremely important that only DEC, 100% certified, Digital Tape Cassettes are used on the TU60 tape drives. The "heavy base" tape in this cassette was specifically chosen to be compatible with the high drive tensions of the TU60. In addition, the head pressure pad material of the cassette has been carefully selected to allow proper take stacking. For optimal operational characteristics, the dynamics of each tape drive require the use of only DEC cassettes.

Do not attempt to use an audio cassette on the TU60 tape drives.

Since the tape in an audio cassette is not designed to tolerate the high drive tensions of the TU60, use of this type cassette will result in extremely rapid deterioration of the tape and subsequent failure of the drive due to excessive tape oxide deposits on the read/write head and tape guides.
The DEC cassette is relatively more expensive than an audio cassette. The lower "high frequency roll-off" of the digital tape also makes it a poor substitute for audio equipment. In addition, the coefficient of friction of the DEC cassette tape does not allow tape motion by capstan and pinch rollers.
In short, the TU60 DECassette Tape Transport and the DEC, 100% certified, Digital Cassette are designed to be used together.
 
TU60   Tape   Cassette
Cassette typeDEC, 100% certified, Digital Tape Cassette
Tape width0,150 inch   (0,381 cm)
Tape thickness1 mil, 0.30 mil oxide
Tape life
 
Guaranteed > 1000 end-to-end forward passes
Typically 2000-6000 end-to-end forward passes
Capacity> 93 kbytes
Storage temperature40 to 122°F   (5 to 50°C)
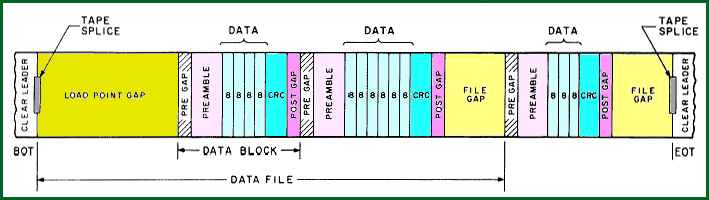
The figure shows a typical TU60 data tape format.

TU60 tape data format
Back to top

OPERATION & TROUBLESHOOTING
There are only 3 manual controls on the TU60. On the rear panel is the power ON/OFF switch for the entire transport. On the front is a separate REWIND pushbutton for each drive. Each drive also has a Power-On indicator. When the power ON/OFF switch is in the ON position, both Power-On indicators are lit. When you press the REWIND button on one of the drives, the tape on that drive is rewound, at high speed, to the BOT (Begin Of Tape) marker if a tape is loaded and the tape is not moving under program control. Pressing the pushbutton during a program-controlled operation has no effect.
If the cassette is properly loaded, one of the "cassette loaded" microswitches is actuated, removing the "unloaded" interlock condition. An other microswitch senses if the tape is write protected. For read, write, and search operations both reel motors are on. For forward motion, the control motor rotates counterclockwise, while a slight reverse torque is applied to the tension motor to maintain the proper tape tension. For reverse motion, the control motor rotates clockwise, while a greater torque is applied to the tension motor to take up tape and thus maintain the proper tape tension. For rewind operation (tape travel from lower to upper reel), the control motor solenoid is de-energized, and the lower tape reel can move freely. The upper tension motor is turned on at constant speed to rewind the tape to the BOT (Begin Of Tape) marker. BOT is detected by the clear leader of the tape with a lamp and a photosensor.
capacity vs. blocking factor
The figure shows that the TU60 performs best when the data blocks written to the tape contain 256 bytes or more. With a little performance degradation, a block factor of 128 bytes per block can also be used. With a smaller block size you see that the data transfer rate and the amount of data that can be stored on a cassette drops dramatically.

Care of tape cassettes
Just as with diskettes, disks and other storage media there are some guide lines of use.

  • Do not expose tape cassettes to excessive heat or dust.
    Most tape read errors are caused by dust or dirt on the read/write head. It is important to keep the tape clean.
  • Always store the tape cassette in the plastic storage boxes when the tape is not in use.
    Keep empty boxes closed to guard against dust and dirt.
  • Always rewind the tape to the BOT leader before you remove the cassette from the drive.
  • Never touch the tape. Oil from fingers attract dust and dirt.
  • Never use a contaminated tape cassette. This spreads dirt to the clean tape cassettes and could adversely affect tape transport reliability.
  • Do not smoke near the tape transport or storage media. Smoke and ash are especially damaging to tapes.
  • Do not put tape cassettes near lineprinters or other devices that produce paper dust.
  • Do not put tape cassettes in any location where it may be affected by hot air.
  • Do not store tape cassettes near electric motors or any other magnetic sources that may erase data.

Loading and unloading the DECassette
If you load a new cassette (or a cassette just shipped or accidentally dropped), load the cassette on a drive and perform a rewind operation. Then remove the cassette, turn it over, and perform an other rewind operation. This is done to pack the tape neatly in the cassette and also to place the full tape reel at the proper operating tension.
A cassette may be loaded on the drive with the drive locking bar either opened or closed. However, it is easier to load a cassette with the bar opened. Do the following steps to load a cassette.

  1. Set the cassette write protect tab for the desired operation.
    TU60 front ID label The write protect tab is located on the cassette top right, when viewed with the label side up. To inhibit a write operation, fold this tab back to open the cassette recess. To allow a write operation, return the write protect tab to close the recess hole.
  2. Hold the cassette with the thumb and index finger, and insert the cassette towards the left, at approximately a 45° angle, into the drive. Make sure that the cassette label faces outward and that the exposed cassette tape is to the left of the drive sprockets.
  3. Apply a leftward pressure, while simultaneously rotating the cassette inward onto the drive sprockets. This action allows the cassette tape edge to slide under the lower door (lower door opens slightly) and bottom against the tape guides and read/write head.
  4. When the cassette is properly loaded, the locking bar automatically closes over the cassette back edge and the lower door closes flush with the drive frame.
  5. Press the manual REWIND pushbutton.
    The cassette is ready for read/write operations.

  6. To unload the cassette, first, rewind the tape to the BOT leader.
  7. To remove the cassette, gently push the locking bar to the right until it detents and withdraw the cassette from the drive.

Cleaning the TU60 DECassette Tape Drive
DIGITAL describes a preventive maintenance schedule in the maintenance manual which is based on a 4-hour use per day.
I do not think you run the unit that often as a hobbyist, but here are some useful tips.

  • Clean the tape heads and guides using the appropriate head cleaner and a soft, lint-free cloth or cotton swab.
    Make sure that no parts still have head cleaner fluid when you use the drive. The fluid destroys the protective coating of the tape surface!
  • Inspect the spindle assembly on each drive.
    Remove dirt, and if cleaning is needed on the rubber wheel, use a small brush and non-flammable cleaner.
  • Check the fan filter and the fan. Clean if necessary.
  • Run the MAINDEC diagnostic programs.
  • Inspect the transport interior and exterior and clean if necessary.
Back to top

TU60 UNIBUS INTERFACE
The TU60 interface module (M7292) can control one TU60 (2 drives).
The module M7892 is identical to the M7292, but has 8881 and 380.

more to be added soon ...

Installation of the TU60 DECassette Tape Drive
The TU60 connects to the TU60 interface module with two flat cables.

TU60 assembly
  • Load a DECassette on each tape drive and momentarily press both REWIND pushbuttons.
    Make sure that the tape completely rewinds to the BOT clear leader (approximately 20 seconds).
  • Momentarily press both REWIND pushbuttons again and check that the tape drives rewind the tape for approximately 1 second.
  • Run the appropriate diagnostic tests to make sure that the tape drives operate correctly.
Back to top

TU60 CONTROLLER DIAGNOSTICS

AddressInstruction
000200013737
000202177570
000204177500
000206000137
000210000200
You can toggle in the small program on the left side. The program starts at address 000200, and reads the switch setting of the Switch Register to set the tape motion. The switch settings are listed in the table at the right.
OperationDrive ADrive B
Read000005000405
Space Back Block000011000411
Space Forward Block000015000415
Write000003000403
Rewind000017000417

The MAINDEC diagnostic programs use the following Switch Register settings.

    SW 15=1   (100000)   halt on error
    SW 14=1   (040000)   loop on test
    SW 13=1   (020000)   inhibit error reports
    SW 10=1   (002000)   ring bell on error
    SW 09=1   (001000)   loop on error
    SW 08=1   (000400)   do not change drive
    SW 07=1   (000200)   pause 200 ms

TU60 BOOTSTRAP DATA
I do not know if you can bootstrap a PDP-11 from a TU60 DECassette.
Given the storage capacity of a DECassette ...
Back to top