Rotary switch using a potmeter ...

| Rotary switches but not a switch ! Rotary switch using a potmeter ... |
|
Some of the rotary switches on the F-16 control panels use a 30° angle to mechanically move to the next position. These rotary
switches are cheap and readily available in the local electronics shop. However, the "not standard" rotary switches use a
different angle, for example 36° or 45°. These switches can be ordered for example from Greyhill, but those are not cheap ...
The "problem" becomes even worse if the rotary switch has a specific property like a momentary spring-loaded position.
It means that you can rotate the knob to that position, but as soon as you release the knob, the rotary switch will automatically
move back to the adjacent position. That kind of rotary switch is even harder to obtain and carries an in proportion price tag :-).
So, I propose a mechanical solution which is fairly simple, flexible and above all, cheap!
Every position that a rotary switch can have implies a wire to the hardware interface so that the software can "read" each
position. So, for a 6 position rotary switch you need (at least) 7 wires, and due to the "switch matrix" hardware probably
6 diodes.
The proposed solution does not use a rotary switch, but a potentiometer and some mechanical construction
work to obtain the position "stops". The choice of a potmeter has a beneficial electrical interface implication. You do not need
the digital inputs (and diodes) and a number of wires at least equal to the number of positions, but in principle just one wire
which connects to an analog input. So the electrical wiring in the cockpit becomes simpler!
The resistance value of the potmeter is not critical, but a value between 2k and 10k is advised. The potmeter must be of the linear type. As we will use the potmeter only set to specific positions the value will have a discrete small range for each position. Likewise, when the potmeter is connected to an analog input, the voltage read by the sofware will also show specific small ranges for each physical position.
Depending on the length of the cable (location of the potmeter with respect to the analog input hardware) it may be wise to use a simple shielded wire as used for microphones. One center conductor with a braided shield is enough to connect a potmeter. Note that +5 Volt must also be wired to the potmeter, optionally decoupled with a small capacitor to ground (shield of cable).
Parts needed:
 The tricky part: construction of the disk. This is described in the separate section below.
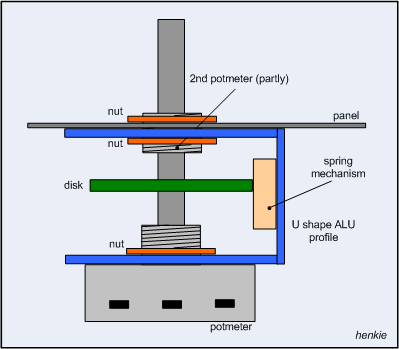
 The "position disk" is just a plate of metal that can be mounted perpendical onto the shaft of the potmeter. As that may pose
the first mechanical difficulty, I chose a brass toothed gear wheel which has a "hub" with a threaded screw to mount the gear
wheel on an axis.
The "position disk" is just a plate of metal that can be mounted perpendical onto the shaft of the potmeter. As that may pose
the first mechanical difficulty, I chose a brass toothed gear wheel which has a "hub" with a threaded screw to mount the gear
wheel on an axis.
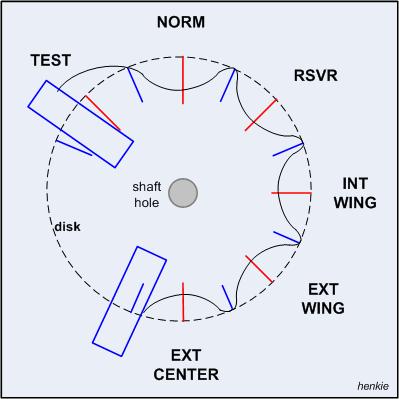
To create the "stop" positions of the rotary switch, I used a file to create index holes. First, I made a drawing on paper of the actual rotary switch positions (the red lines), and drew "helping lines" (the blue lines) between the switch positions. No metal should be removed at the helping lines, only at the "stop" positions. The curved black line gives an idea of the needed circumference.
To obtain the mechanical feeling of the rotary switch positions and the transition from one position to the next I made a "lever". That is a small arm attached at the "U"-shaped bracket (with a pivot point) and at the opposite side attached to a spring. I was so lucky to have a microswitch in the junk box that has a detachable arm of steel with at the end a small 'roller'. The steel provides the spring action.
Small rectangular pieces of aluminum (the blue boxes) are attached to the gear wheel to create end stops. Using the arm of the
microswitch, the roller will bump against the rectangular piece of aluminum.

I received an email from Viperpit member Klaus. He told me that the PHCC Motherboard scans the analog inputs, and sends a measured value for every detected change. As you rotate the knob, the resistance will have (in theory) infinite changes ... this implies a severe impact on performance as many values are sent to the software which in fact are useless. If the software polls the analog input channels at a rate of 20 ms, you will receive all measured values, thus the "final" switch position detection will take time! That time might be too long, causing unwanted or strange behavior. This needs to be checked out for sure!